Thursday, December 20, 2018

Blue Pea Flower Chiffon Cake/ 兰花戚风 and Blue Pea Tea

Pin It Now!


A friend mentioned going to bake chiffon cake with dried blue pea. I never tried before and wonder how the colour will turn out. Well here is the look of my blue pea chiffon cake. 

Friday, May 8, 2015

Banana Chiffon Cake

Pin It Now!

We used to bake butter cake, muffins with overripe banana. Have you ever try using it in baking chiffon cake ? Although this recipe using quite lots of banana the texture still remain light and fluffy. But make sure you puree the banana with food processor into paste before use it.

Wednesday, October 8, 2014

Neapolitan Chiffon 三色戚风

Pin It Now!

I wanted to bake chiffon cake to serve my friends. In order to make it special I present my chiffon in Neapolitan way! Hope you will try and love it!

Thursday, April 3, 2014

Pandan Chiffon Cake (香兰戚风)

Pin It Now!

Pandan chiffon cake is very common and easy available at any bakery shop. However most of them are using artificial flavouring. With homemade pandan extract I can bake pandan chiffon with nice pandan fragrance in natural green colour. That is the reason friends used to order from me. Thanks for the support and orders :) 

Saturday, November 3, 2012

Yogurt Cottony Cake (想思蛋糕)

Pin It Now!

Cottony cake or some call it Xiang Si cake/ 想思蛋糕. I was attracted by the texture of this cake when I read from fellow blogger friends. This cake is well received as it yields very soft and moist cake. If you are chiffon cakes lovers sure you like this cottony cake.
 
It has a lot common with chiffon cake. The method of mixing is same. Like chiffon cake it has to be baked at low temperature. The differences are using a whole egg in yolk batter and bake in normal baking pan instead of tube pan. The batter is slightly watery than normal chiffon cake.


This is my 2nd attempt. The 1st one shrunk a lot and has wet cake base. After succeed in baking chiffon cake in round pan (here) and some advice from Kimmy, I have courage to bake again. The cake texture is right, no wet base and without much shrinkage. However the cake surface (skin) is easy to come out (after invert). This might due to low temperature of baking for the whole baking period. Next time I shall bake with higher temperature after the cake is cooked to get more brown surface. Do drop by her blog, Cooking Pleasure for more tips on making cottony cake. She has quite numbers of different flavour cottony cake recipes.
 
 
Adapted and slightly modified from Cooking Pleasure
Ingredients:
( A)
5 yolks
1 whole egg
45g vegetable oil
80g yogurt
65g low protein flour
 
(B)
5 egg whites
60g castor sugar
1/2 tsp vinegar (or lemon juice)
 

Methods:
1. Whisk yolks and castor sugar till well combine. Add in vegetable oil and yogurt. Mix well.

2. Sift in the flour and whisk to combine.

3. In other bowl beat the whites till foamy. Add in 1/2 the castor sugar and vinegar. Continue beat till glossy. Add in the rest of castor sugar. Beat till stiff form.

4. Spoon 1/3 of the stiff whites into yolks batter. Fold to combine. Pour the yolk mixture into the remaining whites bowl. Fold till well combine.

5. Pour the batter into lined 8’ square pan (only line the bottom/base pan NOT side). Smooth the surface with scraper. Give the pan some tap to remove big bubbles.

6. Bake in preheated oven at 140C with steam bake method for 35 minutes. Then remove the water and bake further 10 minutes.
* I'm using steam bake method. Bake by placing a pan with hot water at the bottom of oven.
* Remove water and bake further to get rid of wet cake bottom.

* Do adjust your oven temperature accordingly.

7. Once cooked, remove from oven and invert the cake pan on wire rack till cool completely. Remove baking paper and cut into slices. Enjoy!


I'm sharing this post at


~Recipe Box 21 hosted by Bizzy Bakes

Friday, September 28, 2012

Sponge Cake (Birthday Cake) / Chiffon Cake Method

Pin It Now!

I make this cake last week. This pink birthday cake is for my little princess :) She is now 1 year old. She still wakes up at night for meals. She still needs to be carried a lot as still can't walk without holding. To her brothers, she is a 'little monster' who likes to disturb whenever they are doing homework. She also keen to 'attacks' toys when they are playing. However her brothers still love her and tolerate with what she did. To them she just a 'baby' inside the house :D

I'm very happy as I manage to get my sponge cake baked without much or very little shrinkage! Thanks to Sonia for helpful tips. Basically this sponge cake is just baked chiffon cake in round pan. In order to get chiffon cake rise nicely in round pan and without much shrinkage after cooling, several things need to be taken care of. Let me highlight some of the points that I know.

1. The pan that you used should not be non-stick. The cake will rise with the help of side pan. Do not lined pan and preferable with removable bottom cake pan. It is easy to remove after cooling.

2. The egg whites should be beaten till stiff stage (十分 / 硬性发泡). Do refer Egg Whites Beating Stage from Carol for the video on how and what the stiff whites look like. Practice make perfect. After master this you can have lots of successful cake that require beaten egg whites.

3. Bake the cake start with low temperature first. The low temperature will cook the cake through and rise slowly. Then finish baking by increase the temperature to brown the cake. This will avoid sudden rise and collapse of the cake. Do not skip the process of baking with higher temperature although the cake is cooked through. I baked at low temperature for the 2nd sponge cake till end. It has little crack compare with the 1st one which finish baking with higher temperature. However the brown surface becomes sticky and easy come out after cooling.
 

I hope with all the points that I highlighted can help you on getting nice, tall and beautiful sponge cake in your kitchen. Let me move to the recipe.    

Ingredients:
(A)
5 yolks
20g castor sugar
30g vegetable oil
1 tsp vanilla extract
45ml milk

(B)
60g cake flour

30g rice flour
*sift and set aside

(C)
5 whites
½ tsp vinegar (can replace with lemon juice)
60g castor sugar

 
Methods:
1. Whisk yolks and castor sugar till well combine. Add in vegetable oil and vanilla extract. Mix well.

2. Whisk in the sifted flour and milk in 2 batches alternatively.

3. In other bowl beat the whites till foamy. Add in 1/2 the castor sugar and vinegar. Continue beat till glossy. Add in the rest of castor sugar. Beat till stiff form
(十分 / 硬性发泡).

4. Spoon 1/3 of the stiff whites into yolks batter. Fold to combine. Pour the yolk mixture into the remaining whites bowl. Fold till well combine.

5. Pour into 8” round pan with removable bottom (do not line with paper and do not use non-stick pan). Bake at 140C for 25 minutes. Increase the temperature to 150C and bake further 25 minutes.
As you see the side not shrink much after cool
6. Once cooked remove from oven. Immediately invert and leave to cool. When cake is cool, remove from mould. Deco the cake as you wish!

I'm sharing this post at: 


Monday, June 18, 2012

Vanilla Chiffon Cake

Pin It Now!

We used to bake different flavour of chiffon cake. Have you try out simple vanilla chiffon cake?  Instead of using vanilla extract this recipe use seeds from vanilla bean. Since I have vanilla bean in my counter I decide to bake this vanilla chiffon cake.
  

Before I go to recipe I like to talk about AlphaBakes which is hosted on alternate months by Ros from The More Than Occasional Baker and Caroline from Caroline Makes. This will be a monthly challenge where the aim is to bake with an ingredient that starts with the random alphabet letter chosen for that month. 

The June Challenge which is hosted by Ros from The More Than Occasional Baker is "V". Therefore I’m submitting this Vanilla Chiffon Cake for the event.

Adapted and slightly modified from Carol
Ingredients:
(A)
5 yolks
30g castor sugar
60g vegetable oil
90ml milk
1 vanilla bean
* can replace with 1tsp vanilla extract
 
(B)
120g cake flour
 
(C)
6 whites
1/2 tbsp lemon juice(replace with 1tsp vinegar)
60g castor sugar


Methods:
1. Scrape the seeds from the vanilla pod. Put the seeds and pod inside the milk. Cook the milk with low heat till boil. Discard the pod and leave to cool.


2. Pour egg yolks and sugar in a bowl. Whisk till sugar dissolves.

3. Add oil, vanilla infused milk into the bowl. Stir well.

4. Fold in sifted flour and mix till smooth.

5. In another bowl whisk the egg whites till frothy. Add vinegar then sugar gradually and beat till stiff.

6. Fold in 1/3 of the whites into the yolk mixture till well incorporate.

7. Pour the mixed batter into the remaining egg whites bowl. Fold gently till well combine.

8. Pour into 22cm chiffon mould. Bake at 160C for 45 minutes.

9. Once cooked remove from oven. Immediately invert and leave to cool. When cake is cold, remove from mould.

 
This 5 yolks and 6 whites chiffon cake recipe yield very soft and fluffy texture. Why not you try and find out ? Happy baking!


Thursday, March 8, 2012

Fun with Angry Birds Cake ^_^

Pin It Now!

I'm not fans of angry birds but my sons are. After know the technique of picture transfer on decorating frosted cake I eager to try again. I can use the leftover piping jelly at the same time. The important thing is to cheer my kids :)


I look around the house for the angry birds picture that I can use. After some drafting and drawing (with melted chocolate) here come my frosted cake with these four famous angry birds. This time I baked in 9" round pan. So I can get bigger surface for the 'birds'. 


I like Carol's blog very much. She is one of my 'Sifu' (master). Her recipes and steps are very details. Today I try to translate her chiffon cake recipe into English. I will provide her useful video links as well. Hoping this can help those can't read and understand Mandarin. For those who want to learn more about chiffon cake do hop in her blog for useful lessons.


Adapted from Carol's plain chiffon cake.
Ingredient:
(A)
5 yolks
20g castor sugar
30g vegetable oil
½ tsp vanilla extract
45g milk
90g cake flour


(B)
5 whites
1tsp (5cc) lemon juice
60g castor sugar


Preparation:
1. Weight all the ingredients and set aside.

2. Use cold eggs. It is advice to use small bowl for the white separation. Only pour inside mixing bowl when the whites are clean from yolk. Any bits of water or oil in whites will affect the result of whites beating process.
* I used to drop 1/2 teaspoon of white vinegar into mixing bowl and wipe clean with kitchen towel before adding the whites.

3. Sieve the cake flour and set aside.

4. Preheat oven to 150C.
* I bake mine at 160C. Do adjust your oven accordingly.
 

Method:
1. Whisk the yolks and sugar till well combine.
 
2. Add in the vegetable oil and vanilla extract and mix well.

3. Add in the sifted flour and milk alternatively in 2 batches. Mix till well combine.

4. With electric mixer beat the whites till foamy. Add in the lemon juice and 1/2 of the castor sugar. Continue beating with low-medium speed till light and double in volume.

5. Add in the rest of castor sugar. Beat with high speed till become glossy and reach stiff peak. Refer here for video.

6. Take a big spoonful of beaten whites into yolks batter. Fold in and mix well. Refer here for the video.

7. Pour the mixed yolks batter into the remaining stiff whites bowl. Fold and mix well.

8. Pour the batter into 8" round pan. Smooth the surface with scraper. Give some taps to the pan to release big bubbles trapped inside. Bake in preheated oven 150C for 45-50 minutes. (Test by insert a tooth pick inside the cake center. It is done when came out clean. If not done bake further 5-10 minutes).


9. Remove from oven. Invert cake immediately and place on rack to cool completely. Remove the cake from the pan and proceed with cutting and decorate. Please refer here for other useful tips on cooling and removing chiffon cake from pan.
 
 
Happy Baking!


Friday, November 11, 2011

Purple Sweet Potatoes Chiffon Cake

Pin It Now!


This chiffon cake is slightly different with others that I had baked. The ingredients more or less same but the sequence added are different. I’m glad the chiffon cake still turns out soft and fluffy.


I omit the lemon juice as I want to retain the purple colour in my chiffon cake. I omit the chunks of potatoes too as my family prefer plain chiffon cake. Do visit Happy Home Baking blog for smaller portion chiffon cake (17 cm tube pan) recipe.

Adapted and slightly modified from
Happy Home Baking
Ingredients:
(A)
4 egg yolks
110ml milk
90g purple sweet potatoes(mashed)

35g vegetable oil
80g cake flour (sifted)
20g sugar
1/4 tsp salt


(B)
4 egg whites
45g sugar

10g cornflour (sifted)


Methods:
1. In a mixing bowl, hand whisk the egg yolks, milk, mashed sweet potatoes till well combine. Add in the oil, stir to mix. Follow by sieved flour and whisk till well incorporate. Add in sugar, salt and stir to combine.

2. In other bowl, beat the egg whites till frothy with electric mixer. Add sugar gradually (1 tablespoon at a time) and beat with high speed. Add the cornflour together with the last tablespoon of sugar. Beat the egg white till reach soft peak stage.

3. Fold in 1/3 of the whites into the yolk mixture till well incorporate. Pour in the remaining egg whites and fold gently till well combine.

4. Pour into 20 cm chiffon mould. Bake at 160C for 40 minutes.

5. Immediately invert it after removal from oven. Leave to cool. When cake is cold, remove from mould.


Friday, September 2, 2011

Oreo Chiffon Cake

Pin It Now!


I read this oreo chiffon cake recipe from Bakericious and found that it is very interesting! The taste of this chiffon cake is great especially when it contains bits of oreo crumb.

Since I have the left over one egg white from other baking, I used it in this oreo chiffon. The cake ends up very tall (same height as 22cm chiffon mould). I'm glad that the texture is soft and fluffy.


Adapted and slightly modified from Bakericious 
Do visit Wendy, CherryPotato and Awayofmind blogs for the similar recipe.
Ingredients:
(A)
5 egg yolks
20g sugar
1/4 tsp salt
40g vegetable oil
80ml milk

100g cake flour or low protein flour

(B)
6 egg whites
1/4 tsp cream of tartar

50g sugar

(C)
65g Oreo (crumb)
* Put into plastic bag, lightly crush with rolling pin.


Methods:
1. Put egg yolks and sugar in a bowl. Whisk till sugar dissolves.

2. Add in salt, oil and milk into the bowl. Stir well.

3. Fold in sifted flour. Mix till smooth.

4. In another bowl, whisk the egg whites till frothy. Follow by cream of tartar. Then, add sugar gradually and beat till stiff. Fold in 1/3 of the whites into the yolk mixture till well incorporate. Pour in the remaining egg whites and fold gently till well combine.

5. Pour into 22 cm chiffon mould. Bake at 160C for 45 minutes.

6. Immediately invert it after removal from oven. Leave to cool. When cake is cold, remove from mould.

Friday, August 19, 2011

Earl Grey Rice Chiffon Cake

Pin It Now!

I read Earl Grey Chiffon Cake from Hanushi blog and very tempting to try on my own. Since I have 2 bags of Earl Grey tea, it is time for me to bake with them!

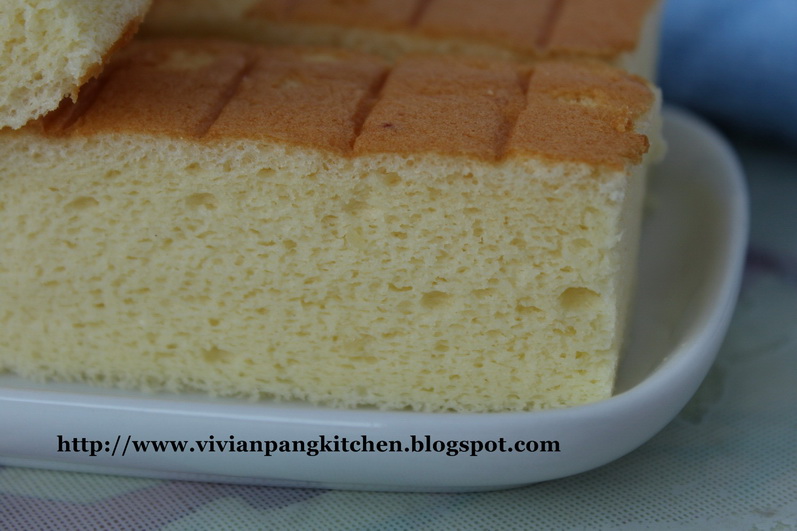
Actually the scent of Earl Grey in my chiffon cake is very mild. Maybe the amount of tea that I used is not enough. Or maybe I didn't put enough tea powder into the batter. I infused the Earl Grey tea with hot water instead of adding the tea powder directly into the batter. The reason is I find that my "tea powder" is not fine enough. Overall this is a nice chiffon cake.  


Ingredients:
(A)
5 egg yolks
30g sugar
50g vegetable oil
1/4 tsp salt
100ml Earl Grey tea (from 2 tea bags)

(B)
80g cake flour
45g rice flour

* Sift and set aside

(C)
5 egg whites
1/4 tsp cream of tartar

50g sugar

Methods:
1. Pour hot water (about 100ml) into Earl Grey tea bags. Leave aside for 15 minutes. Measure to get 100ml tea liquid. Keep 1 of the used tea bag for the tea powder.


2. Pour egg yolks and sugar in a bowl. Whisk till sugar dissolves.


3. Open the used tea bag(from step 1). Add in the tea powder together with the rest of ingredients (A) into the yolk mixture. Stir to combine.

 
4. Fold in sifted flour. Mix till smooth.


5. In another bowl, whisk the egg whites till frothy. Add in cream of tartar. Then, add sugar gradually and beat until stiff. Fold in 1/3 of the whites into the yolk mixture till well incorporate. Pour in the remaining egg whites and fold gently till well combine.


6. Pour into 22 cm chiffon mould. Bake at 160C for 45 minutes.


7. Immediately invert it after removal from oven. Leave to cool. When cake is cold, remove from mould.

Tuesday, August 16, 2011

Yogurt Chiffon Cake

Pin It Now!


This is my first time of using yogurt in my chiffon cake baking. I read this recipe from Happy Home Baking and very attracted by her lovely Cranberry Yoghurt Chiffon Cake. Since I have yogurt sitting in my fridge, it is the good time to bake with it. I omit the cranberry as my family prefer chiffon cake without any filling. I added some vanilla extract instead. I like the outcome of this recipe. I definitely will bake again.

Adapted and slightly modified from Happy Home Baking, Cranberry Yoghurt Chiffon Cake.
Ingredients:
(A)
4 egg yolks
20g sugar
40g vegetable oil
1/4 tsp salt
1 tsp vanilla extract
80g yogurt

(B)
80g cake flour

(C)
4 egg whites
50g sugar 

Methods:
1. Pour egg yolks and sugar in a bowl. Whisk till sugar dissolves.


2. Add in the rest of ingredients (A) and stir to combine.


3. Fold in sifted flour. Mix till smooth.


4. In another bowl, whisk the egg whites till frothy. Add sugar gradually and beat until stiff. Fold in 1/3 of the whites into the yolk mixture till well incorporate. Pour in the remaining egg whites and fold gently till well combine.


5. Pour into 20 cm chiffon mould. Bake at 160C for 40 minutes.


6. Immediately invert it after removal from oven. Leave to cool. When cake is cold, remove from mould.


Related Posts Plugin for WordPress, Blogger...