Wednesday, October 3, 2012

Rainbow Swiss Roll with Natural Colouring/ Chiffon Cake Method

Pin It Now!

Lately quite numbers of rainbow bakes appear in blogging atmosphere. Rainbow breads, 
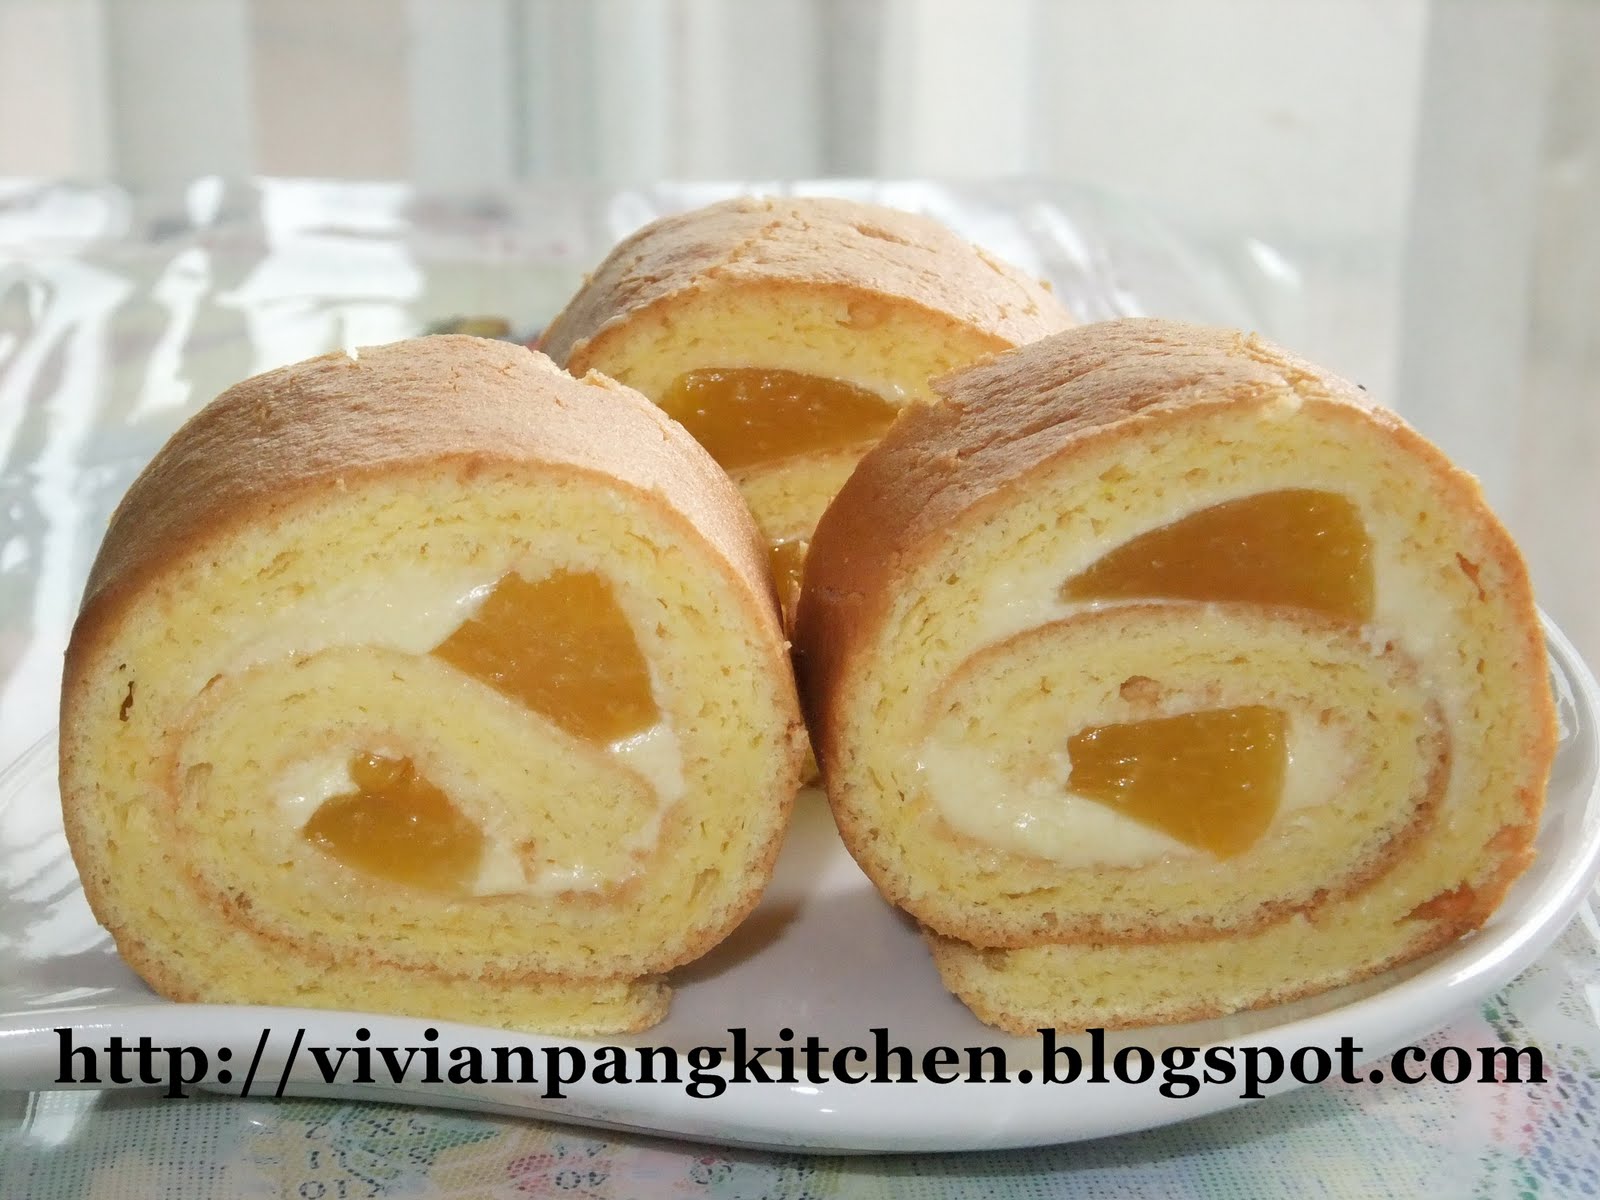
cakes and even cookies! Those colourful bakes inspired me to bake my 1st rainbow Swiss roll :) Instead of using artificial colouring I used natural colouring which I can get from fresh ingredients. Green from pandan juice, black from black sesame seed powder, red from red yeast rice (红曲米) powder and brown from cocoa powder.
 
Never heard of red yeast rice powder? Here is the picture of the rice. I just blend it into powder before use. You can't taste the rice but you definitely can see its' bright red colour :)
Click Red yeast rice to know more

 
Ingredients:
~Swiss roll
(A)
4 yolks
20g castor sugar
30g vegetable oil
40g milk
60g cake flour
20g rice flour

(B)
4 whites
1/2 tsp vinegar (or lemon juice)
50g castor sugar

~Colouring (about 80g batter for each colour)
Green: 2 tsp homemade pandan concentrate juice

*blend few pandan leaves with water and keep in fridge for 1-2 days. Used the liquid(concentrate juice) that sink at the bottom.
Black: 1 tsp black sesame powder
Red: 1 tsp red yeast rice powder (blend red yeast rice into powder)
Cocoa: 1 tsp cocoa powder

~Filling
40g butter
20g icing sugar
30g whipping cream
Beat butter and sugar till light. Add in whipping cream and beat till slightly thicken. Keep in fridge for later used.

Methods:
~Swiss roll
1. Whisk yolks and castor sugar till well combine. Add in vegetable oil and mix well.

2. Whisk in the sifted flour and milk in 2 batches alternatively.

3. In other bowl beat the whites till foamy. Add in 1/2 the castor sugar and vinegar. Continue beat till glossy. Add in the rest of castor sugar. Beat till stiff form.

4. Spoon 1/3 of the stiff whites into yolks batter. Fold to combine. Pour the yolk mixture into the remaining whites bowl. Fold till well combine.

5. Divide batter into 5 portions (about 80g each). One remains plain and the rest will be coloured batter. Add the natural colouring agent as stated above.


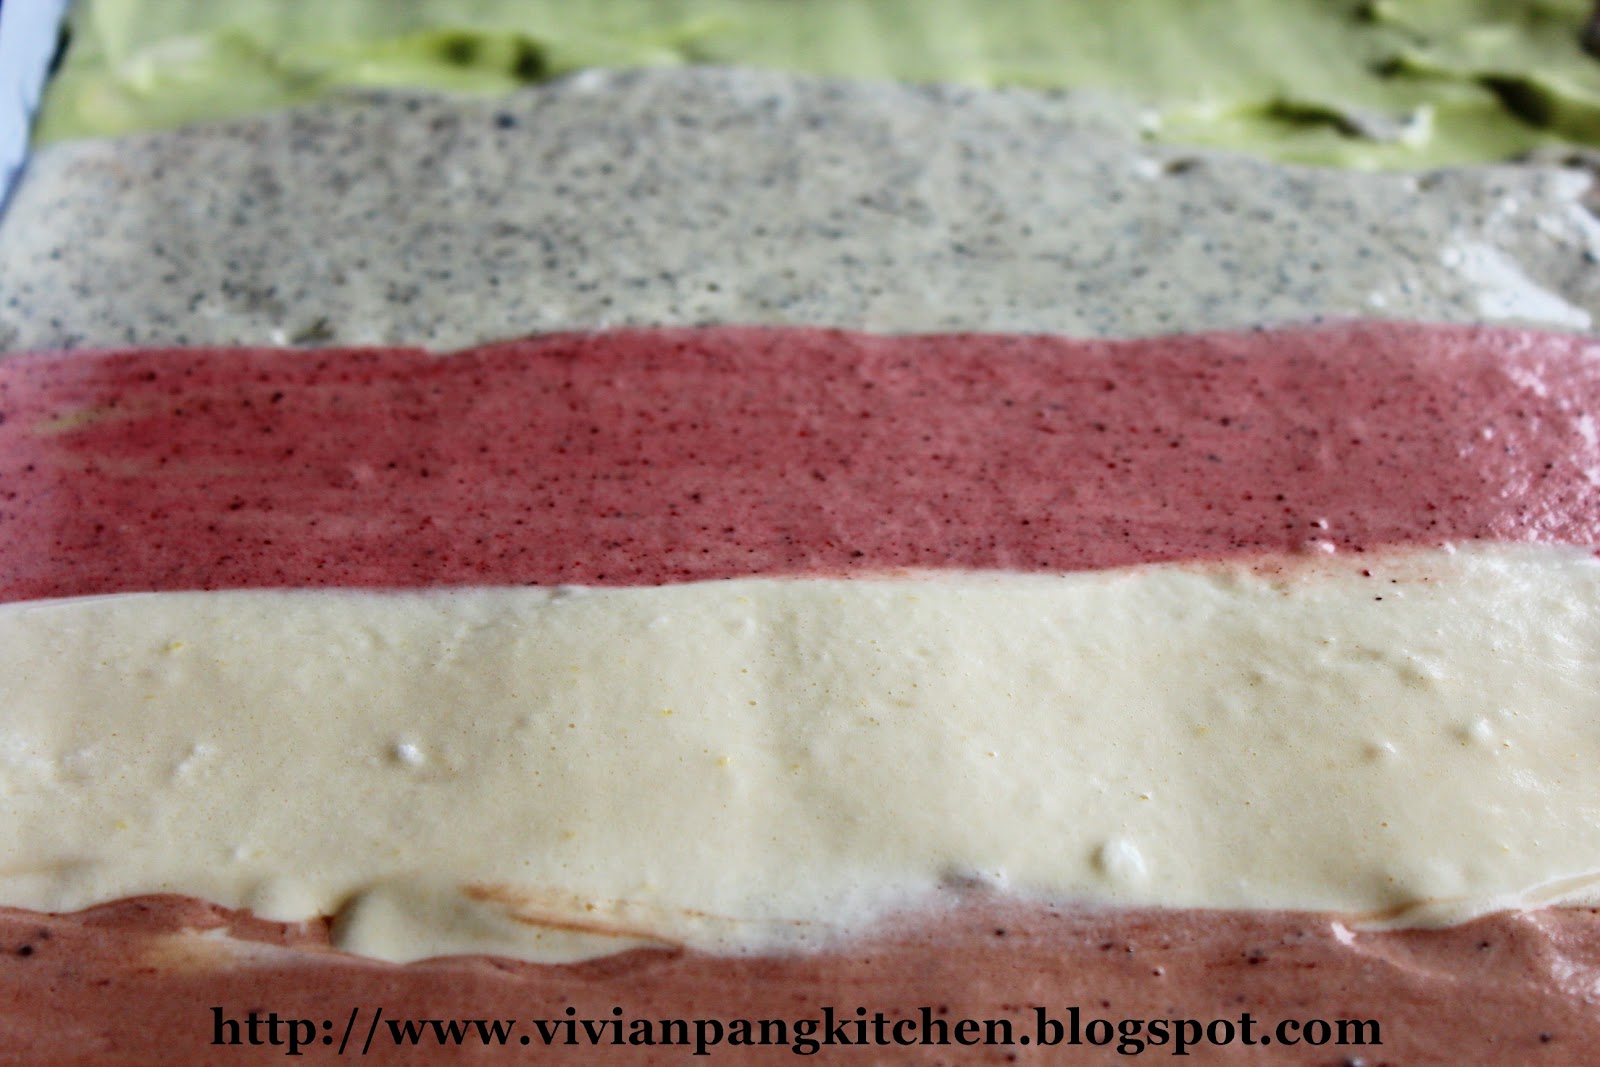
6. Pour the batter into lined and greased swiss roll pan (I'm using 30cm x 36cm) as shown. Smooth the surface with scraper (careful not to mix up the coloured batter).

7. Bake in preheated oven at 180C for 15 minutes. Turn the heat to 200C and bake further 3 minutes.
* I'm using steam bake method. Bake the cake at the middle rack. Place another pan with hot water at the bottom of oven.
* I bake further with higher temperature to get brown darker surface. Do adjust according to your oven temperature.

8. Once cooked, transfer the cake by lifting the baking paper (edges) to wire rack. Leave to cool (about 5 minutes).

9. Invert the cake and gently remove the baking paper. Invert the cake with baking surface on top. With a knife cut 2 lines (at the beginning of rolling point) but the cake is still attached to each other. Spread the filling evenly on the surface. Leave 1-2cm remain unspread.

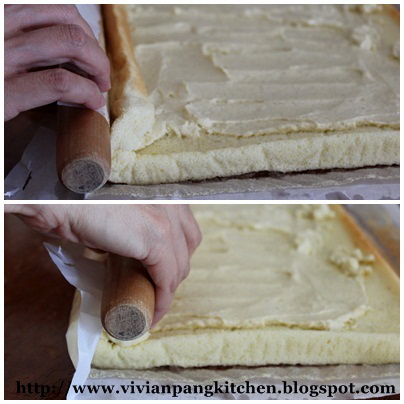
10. Hold the cake with both hands with the help of rolling pin and roll gently (click here for the picture on rolling step). When the swiss roll is rolled up, make sure the ending portion facing downward. Keep the roll in the refrigerator at least 30 minutes before cut and serve.
 

I'm sharing this post at:

~Recipe Box 17 hosted by Bizzy Bakes


Wednesday, August 29, 2012

Vanilla Swiss Roll with Vanilla Crème Mousseline

Pin It Now!
 
 
Recently I have less or no time sitting in front of my computer. My little girl hardly takes her morning and even afternoon nap! If happen it will be short one. After settle her down I need to rush for daily house works and preparing meals.  
 
She won't sit still if I'm working on my posts with the computer. She will crawl to me and want to sit on my lap. Then, her little fingers will try to reach keyboard or mouse. It is impossible for me to do my typing with her >.< That's the reason less posting lately... Hope she will get back to her routine nap so I can have my own time.


It has been quite sometimes I baked swiss roll. Quite numbers of readers asking how I roll my swiss roll. This time with the help of my hubby I manage to provide pictures on the rolling process. Hope it is good enough to show steps on rolling.


As for the filling I used vanilla crème mousseline which is basically custard + butter cream. At first prepare the custard which made from eggs, milk, sugar and flour (or cornflour). The mixture is cooked till smooth and creamy before adding to butter cream. I used only half of the cream for my swiss roll. You might use all if you like.

Reference from Carol and 孟老師的美味蛋糕 cookbook
Ingredients:
~Swiss roll
(A)
4 yolks
20g castor sugar
30g vegetable oil
40g milk
60g cake flour
20g rice flour

(B)
4 whites
1 tsp vinegar (or lemon juice)
50g castor sugar


~Filling: Vanilla Crème Mousseline
40g egg yolk (from 2 eggs)
40g sugar
20g low protein flour
200g milk
1 vanilla pod
100g butter


Methods:
~Vanilla Crème Mousseline filling
 
1. Add yolks and sugar in a bowl. Whisk till well combine. Add in cake flour. Stir to well incorporate. Pour in milk and stir to well combine.
 
2. With a sharp knife spilt vanilla pod into two. Slowly run blade over the pod to get the seeds. Add the seeds together with pod into milk mixture.
 

cooking with double boiler method
 
Make sure cover with cling film if chill in fridge
 
3. Cook the milk mixture on stove at low flame. Do whisk constantly while heating up the mixture. The custard is ready once the mixture turns thick (obvious lines appear on mixture surface as you stir). Discard the pod and leave aside to cool.
 
 
4. While waiting for the custard to cool down, beat butter till light and creamy. Add in the cool custard in 2-3 batches. The filling is ready to be used once all combined.
* You can save the cream inside fridge. Do whisk again to soften the cream to achieve spreading consistency.


~Swiss roll
1. Whisk yolks and castor sugar till well combine. Add in vegetable oil and mix well.

2. Whisk in the sifted flour and milk in 2 batches alternatively.

3. In other bowl beat the whites till foamy. Add in 1/2 the castor sugar and vinegar. Continue beat till glossy. Add in the rest of castor sugar. Beat till stiff form.

4. Spoon 1/3 of the stiff whites into yolks batter. Fold to combine. Pour the yolk mixture into the remaining whites bowl. Fold till well combine.

5. Pour the batter into lined and greased swiss roll pan (I'm using 30cm x 36cm). Smooth the surface with scraper. Give the pan some tap to remove big bubbles.

6. Bake in preheated oven at 180C for 15 minutes. Turn the heat to 200C and bake further 3 minutes.
* I'm using steam bake method. Bake by placing a pan with hot water at the bottom of oven.
* I bake further with higher temperature to get brown darker surface. Do adjust according to your oven temperature.

7. Once cooked, transfer the cake by lifting the baking paper (edges) to wire rack. Leave to cool (about 5 minutes).

8. Invert the cake and gently remove the baking paper. With a knife cut 2 lines (at the beginning of rolling point) but the cake is still attached to each other. Spread the filling evenly on the surface. Leave 1-2cm remain unspread.

9. Hold the cake with both hands with the help of rolling pin and roll gently. When the swiss roll is rolled up, make sure the ending portion facing downward. Keep the roll in the refrigerator at least 30 minutes before cut and serve.

 
This is how I roll wiss roll. After removing the baking paper from the cake reuse it for rolling as well. Recycle ^^  


Make sure the end is facing down while chilling in fridge


Monday, March 26, 2012

Pandan Coconut Swiss Roll/ Chiffon Cake Method

Pin It Now!
 
I’m using my favourite swiss roll recipe from Carol for this Pandan Coconut Swiss Roll. I’m added coconut powder for more flavour. Since I have some piping jelly to clear I used it by adding some pandan colouring.

Adapted and slightly modified from Carol's green tea Swiss roll
Ingredient:(A)
4 yolks
20g castor sugar
30g vegetable oil
40g pandan juice

*from 5 pandan leaves and some water
50g cake flour
20g rice flour
20g coconut powder

(B)
4 whites
1 tsp lemon juice
50g castor sugar


~Filling
Piping jelly + pandan paste colouring


Method:
1. Whisk yolks and castor sugar till well combine.

2. Add in vegetable oil and mix well.

3. Whisk in the sifted flour and pandan juice in 2 batches alternatively.

4. In other bowl beat the whites till foamy. Add in 1/2 the castor sugar and lemon juice. Continue beat till glossy. Add in the rest of castor sugar. Beat till stiff form.

5. Spoon 1/3 of the stiff whites into yolks batter. Fold to combine. Pour the yolk mixture into the remaining whites bowl. Fold till well combine.

6. Pour the batter into lined Swiss roll pan (I'm using 30cm x 36cm). Smooth the surface with scraper. Give the pan some tap to remove big bubbles.

7. Bake in preheated oven at 180C for 14-15 minutes.
* I'm using steam bake method. Bake by placing a pan with hot water at the bottom of oven.


8. Once cooked, transfer the cake by lifting the baking paper (edges) to wire rack. Leave to cool (about 5 minutes).

9. Invert the cake and gently remove the baking paper. Turn the cake over. With a knife cut 2 lines (at the beginning of rolling point) but the cake is still attached to each other. Spread the filling evenly on the surface. Leave 1-2cm remain unspread.

10. Hold the cake with both hands and roll gently. When the swiss roll is rolled up, make sure the ending portion facing downward. Keep the roll in the refrigerator at least 30 minutes before cut and serve.


I'm sending this post to

Sunday, March 18, 2012

Chocolate Swiss Roll with Whipped Cream/ Chiffon Cake Method

Pin It Now!

This is the first time I bake Swiss roll with Carol recipe. The result is very great! My hubby gives very good ranking for it :) I find that the cake is flexible when come to rolling stage. I'm wondering is it due to the rice flour?  


This time I use steam bake method. I bake the cake at the middle rack with a pan of hot water at the bottom of oven. By doing this the cake can stay moist. I know this tip from YouTube. It really makes the difference!

For Swiss roll lovers this recipe definitely worth to try!
Adapted and slightly modified from Carol's green tea Swiss roll
Ingredient:
(A)
4 yolks
20g castor sugar
30g vegetable oil
40g milk
50g cake flour
20g rice flour
1 tbsp cocoa powder
 
(B)
4 whites
1 tsp lemon juice
50g castor sugar


~Filling
Whipped cream


Method:
1. Whisk yolks and castor sugar till well combine.

2. Add in vegetable oil and mix well.

3. Whisk in the sifted flour and milk in 2 batches alternatively.

4. In other bowl beat the whites till foamy. Add in 1/2 the castor sugar and lemon juice. Continue beat till glossy. Add in the rest of castor sugar. Beat till stiff form.

5. Spoon 1/3 of the stiff whites into yolks batter. Fold to combine. Pour the yolk mixture into the remaining whites bowl. Fold till well combine.

6. Pour the batter into lined Swiss roll pan (I'm using 30cm x 36cm). Smooth the surface with scraper. Give the pan some tap to remove big bubbles.

7. Bake in preheated oven at 180C for 14-15 minutes.
* I'm using steam bake method. Bake by placing a pan with hot water at the bottom of oven.

8. Once cooked, transfer the cake by lifting the baking paper (edges) to wire rack. Leave to cool (about 5 minutes).

9. Invert the cake and gently remove the baking paper. With a knife cut 2 lines (at the beginning of rolling point) but the cake is still attached to each other. Spread the filling evenly on the surface. Leave 1-2cm remain unspread.

10. Hold the cake with both hands and roll gently. When the swiss roll is rolled up, make sure the ending portion facing downward. Keep the roll in the refrigerator at least 30 minutes before cut and serve.

Sunday, July 31, 2011

Poppy Seeds Banana Swiss Roll/ Chiffon Cake Method

Pin It Now!


Poppy seeds used to bake along with banana. They are great combination. The poppy seeds not only give texture but also natural looks for this swiss roll.

Inspired from孟老師的美味蛋糕 cookbook
Ingredients:
(A)
3 egg yolks
20g sugar

20g vegetable oil
60g mashed banana
40ml milk


(B)
75g cake flour
1 tbsp poppy seeds
* Sift the flour and mix with the seeds. Set aside.


(C)
3 egg whites
30g sugar


(D) Custard cream filling


Methods :
1. Put egg yolks and sugar in a bowl. Stir till well combine. Add the remaining ingredients (A) and stir well.

2. Fold in sifted flour, poppy seeds and mix till combine.

3. In another bowl, whisk the egg whites till frothy. Add sugar gradually and beat till stiff.

4. Fold in 1/3 of the whites into the yolk mixture till well incorporate. Pour in the remaining egg whites and fold gently till well combine.

5. Pour the batter into baking pan (I'm using 26cm x 26cm) lined with greased baking paper. Smooth the surface with a scrapper. Bake in the pre-heated oven 190C for 15 minutes.

6. Once cooked, transfer the cake by lifting the baking paper (edges) to wire rack. Leave to cool (about 5 minutes).

7. Invert the cake and gently remove the baking paper. Turn the cake over. With a knife cut 2 lines (at the beginning of rolling point) but the cake is still attached to each other. Spread the filling evenly on the surface. Leave 1-2cm remain unspread.

8. Hold the cake with both hands and roll gently. When the swiss roll is rolled up, make sure the ending portion facing downward. Keep the roll in the refrigerator at least 30 minutes before cut and serve.

Peach Swiss Roll/ Fingers Sponge Cake Method

Pin It Now!


This time I'm using fingers sponge cake method for this swiss roll. This method starts with incorporate air into egg white before adding yolks and flour. The interesting thing is it does not need any oil or butter. Therefore is low in fat.

Since I don't have piping bag (for fingers pattern), I baked the batter as usual. This cake texture is little bit dry compare to chiffon cake method. However it still tastes nice.

    
Adapted and slightly modified from孟老師的美味蛋糕 cookbook
Ingredients:
(A)
3 egg whites
55g sugar

3 egg yolks

50g cake flour
10g custard flour
* Sift the flour and set aside.

(D)
Custard cream filling
8 slices of canned peach


Methods :
1. Whisk the egg whites till frothy. Add sugar gradually and beat with high speed till stiff. Change the speed to medium and beat another 1 minute to achieve smooth meringue. 

2. Add in all the yolks and beat with high speed till well combine.


3. Fold in the flour in 3 batches till well combine. Make sure the flour is well mixed in every batches.

4. Pour the batter into baking pan (I'm using 26cm x 26cm) lined with greased baking paper. Smooth the surface with a scrapper. Bake in the pre-heated oven 190C for 15 minutes.

6. Once cooked, transfer the cake by lifting the baking paper (edges) to wire rack. Leave to cool (about 5 minutes).

7. Invert the cake and gently remove the baking paper. With a knife cut 2 lines (at the beginning of rolling point) but the cake is still attached to each other. Spread the filling evenly on the surface. Leave 1-2cm remain unspread. Then, Arrange the slices of peaches on the filling.

8. Hold the cake with both hands and roll gently. When the swiss roll is rolled up, make sure the ending portion facing downward. Keep the roll in the refrigerator at least 30 minutes before cut and serve.

Saturday, July 30, 2011

Raisins Swiss Roll/ Chiffon Cake Method

Pin It Now!


I like this combination of swiss roll. Raisins roll goes well with strawberry butter cream.


Adapted and slightly modified from孟老師的美味蛋糕 cookbook
Ingredients:
(A)
3 egg yolks
20g sugar

Orange zest from 1 orange
20g vegetable oil
40ml milk


(B)
70g cake flour
* Sifted and set aside
50g raisins


(C)
3 egg whites
30g sugar


(D) Butter cream filling
30g margarine/ butter
30g strawberry jam
* Cream the margarine till light and creamy. Add in the jam and beat till well incorporate.

(E) Decorate
Some melted margarine/butter
Some castor sugar


Methods :
1. Put egg yolks and sugar in a bowl. Stir till well combine. Add the remaining ingredients (A) and stir well.

2. Fold in sifted flour and mix till smooth. Add in raisins and stir to combine.

3. In another bowl, whisk the egg whites till frothy. Add sugar gradually and beat till stiff.

4. Fold in 1/3 of the whites into the yolk mixture till well incorporate. Pour in the remaining egg whites and fold gently till well combine.

5. Pour the batter into baking pan (I'm using 26cm x 26cm) lined with greased baking paper. Smooth the surface with a scrapper. Bake in the pre-heated oven 190C for 15-17 minutes.

6. Once cooked, transfer the cake by lifting the baking paper (edges) to wire rack. Leave to cool (about 5 minutes).

7. Invert the cake and gently remove the baking paper. With a knife cut 2 lines (at the beginning of rolling point) but the cake is still attached to each other. Spread the filling evenly on the surface. Leave 1-2cm remain unspread.

8. Hold the cake with both hands and roll gently. When the swiss roll is rolled up, make sure the ending portion facing downward. Keep the roll in the refrigerator at least 30 minutes before cut and serve.

9. To decorate:  Sprinkle castor sugar evenly on working surface (example on baking paper). Brush melted margarine around the swiss roll (before cut). Roll it around the castor sugar.

Related Posts Plugin for WordPress, Blogger...