Saturday, September 7, 2013

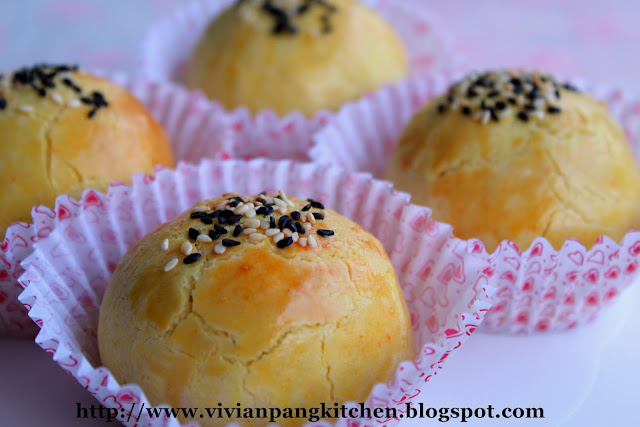
Cantonese Style Baked Mooncake

Pin It Now!
Pin It
I always want to make baked mooncake. This year I wait no more and try this recipe which has been bookmarked one year ago. I'm not really like mooncake however I like to learn how to make it. For this recipe I attempted 4 times in order to get result that I satisfy. 


Saturday, September 29, 2012

Flaky Mooncake with Red Bean Filling

Pin It Now!

Flaky mooncake is the type of mooncake I like the most. Last year I make thousand layers mini yam mooncake, flaky mooncake (Fookchow style), and flaky flower mooncake. This year I choose this type of mooncake again. The pastry is considered Chinese pastry and it contains water and oil dough. The process of rolling and folding that creates beautiful layers.


The ideal fat to be used is clarified butter and ghee. However it can be substitute with lard. But today I'm using chicken fat. Do refer here and find out how to make your own chicken fat.
 
 
Ingredients:
~ Water dough: about 9 x 27g each
150g plain flour
15g icing sugar
55g chicken fat 
42ml water
 
~ Oil dough: about 9 x 16g each
100g low protein flour
50g chicken fat
 
~Filling
Homemade red bean paste (9 x 50g each)
*Shape into ball and set aside
 
~Topping
One egg for egg wash
Some black and white sesame seeds
 
Do refer to Carol blog for pictures and video links on making Chinese pastry.
Methods:
~ Water dough
1. Mix the sifted flour and sugar together. Add in the oil and mix roughly. Pour all water at once and knead to form soft dough.
* I found that it is easier to get soft dough by adding all water at once.
 
2. Cover and leave to rest for 30 minutes.
 
~ Oil dough
Mix all ingredients together and knead to form dough.
* Do not over knead.
 
~ Shaping
1. Divide the water and oil dough into 9 portions (water dough 27g each and oil dough 16g each). Shape them into balls.
 
2. Wrap each oil dough with water dough and form a ball. Repeat the same for the rest.
 
3. Roll out the ball (start from the 1st ball from step 2) into oval shape. Then roll up like swiss roll. Keep aside to rest. Repeat the same for the next ball.
 
4. Back to the 1st roll, flatten into long oval shape (do flatten by apply pressure from the middle, up and down). Again roll up like swiss roll. Repeat the same for the rest.
 
 5. With the closing facing up, slightly press with finger in the middle to form ball. Flatten the ball into round. Wrap in the filling. Shaping by slightly flatten the dough (Hold the base as you apply pressure on top while shaping. This can minimize the filling from leaking). Repeat the same for the rests.
 
6. Apply egg wash and sprinkle sesame seeds on top. Bake in preheated oven 180C for 20 minutes.
 
My flaky mooncake will turn soft the next day. Anyone know the reason? How can I get crispy layers? I really appreciate if anyone can help.
 
This will be my last mooncake post. I hope I have time to try out traditional moocake next year.


Wishing everyone a Happy Mid-Autumn Festival !
中秋节快乐! 
 

Wednesday, September 26, 2012

Shanghai Mooncake

Pin It Now!
 
Mooncake with buttery pastry and sweet filling definitely well received by crowd. I saw this Shanghai mooncake recipe in Sonia house. Without much consideration I know I have to make this. I omit salted egg yolk and half the recipe. It is pretty much like making pineapple tarts ^^


Adapted and slightly modified from Sonia, nasi Lemak Lover
Half of the recipe yield 9 pieces mooncake
Ingredients:
~ pastry
125g butter
75g icing sugar
1/2 egg (large)
190g plain flour
30g custard powder

~filling
Homemade red bean paste (from early post) or any of your preferred filling
 
~topping
Egg wash from remain half egg from pastry
Black and white sesame seeds

Methods:
1. Weight 40g of red bean paste each. Shape into ball and set aside.
*If your self-made red bean paste curdle and hard after take out from fridge, slightly knead with hand to soften it. It is a lot easier to divide and shape.

2. Beat butter and icing sugar till creamy (do not over beat, 2-3mins just nice).

3. Add in egg, beat well to combine. Add in sifted flour and custard powder. Fold to combine into soft dough.

4. Cover with cling wrap and chill in the fridge for 30 minutes.

5. Weight dough for 50g each and shape to ball.

6. Flatten dough with palm and wrap up the red bean paste filling. Shape it like an egg shape. Place on baking tray.

7. Lightly brush the whole mooncake with egg wash and decorate top with black and white sesame seeds.

8. Bake at pre-heated oven at 180C for 20-25 minutes.

9. Leave to cool on wire rack completely before store.
 

Tuesday, September 18, 2012

Konnyaku Pandan Soya Mooncake with Red Bean Filling

Pin It Now!
 
I want to bake some mooncakes but I don't have any filling with me now. So I started this year mooncake making with konnyaku mooncake with red bean filling.


This year I'm lucky to have new jelly mould from Doreen of My Little Favourites DIY. The patterns are very lovely! Actually this konnyaku mooncake is inspired by her agar-agar mooncake recipes. Looking for creative agar-agar mooncake? Then you must drop by her blog for steps by steps mooncake making recipes. Thanks again Doreen!


Ingredients: yield about 8 pcs big mooncakes
(A) Pastry
10g konnyaku jelly powder
150g sugar
 
650ml water
350ml non-sweet soya milk
20ml homemade concentrate pandan juice
*blend few pandan leaves with some water. Leave inside fridge for few days before used.

(B) Filling
100g cooked red bean


Methods:
1. Put the konnyaku jelly powder and sugar in a bowl. Mix till well combined. Set aside.

2. Bring the water to boil. Scoop some of the hot water into jelly powder mixture from step (1). Stir until most of the konnyaku jelly powder dissolve.

3. Pour the step (2) mixture back into the remaining hot water. Stir and bring to boil. Cook until all the sugar and konnyaku jelly powder dissolve.

4. For the filling, measure 150ml of cooked konnyaku mixture into red bean bowl. Stir to well combine. Pour into small jelly mould and leave to set.
*I only pour 3/4 of small mould. It is perfect size as 'filling'.
*once set, remove from mould and set aside.


5. Add in soya milk and pandan juice into the remaining cooked konnyaku mixture. Bring to boil again. This will be pandan soya pastry mixture.


~ Assemble
1. Scoop some pastry mixture and fill about 1/4 of the mould. Leave aside to set.
* I keep in fridge to fasten the setting process.
* you might need to heat up the pastry mixture if harden.


2. Once the pastry set, place red bean filling in the center.

3. Pour pastry mixture up to the top. Leave to set and chill in the fridge.


4. Loosen the side of the konnyaku, invert and gentle press the jelly out of the mould. Enjoy!


I'm submitting this post to Muhibbah Malaysian Monday hosted by Suresh of 3 hungry tummies.

Wednesday, September 14, 2011

Flaky Mooncakes (Fookchow style)

Pin It Now!
 
This year I made quite numbers of mooncake however most of them given out as present to friends. Since now is still Mid-Autumn month I think is never too late to have more mooncakes.


I was tempting to make flaky mooncake again once I read Lena’s Fookchow mooncakes. I used purple sweet potato as filling instead.


Adapted and slightly modified from Frozen Wings
Ingredients:
~ Purple sweet potato filling
400g sweet potato
40g brown sugar
Pinch of salt
20g margarine/ butter

~ Water dough: about 10 x 22g each
120g plain flour
15g icing sugar
40g vegetable oil
50ml water
 
~ Oil dough: about 10 x 11g each
90g plain flour
15g lard
15g vegetable oil


Methods:
~ Sweet potato filling
1. Steam the sweet potato till soft . While it is hot, add in brown sugar, salt and margarine. Mix well and mash into paste.
* I used electric mixer (with “K” hook) to do the job.

2. Leave aside to cool. Divide into 30g each.

~ Water dough
1. Mix the sifted flour and sugar together. Add in the oil and mix roughly. Pour all water at once and knead to form soft dough.
* I found that it is easier to get soft dough by adding all water at once.

2. Cover and leave to rest for 30 minutes.

~ Oil dough
1. Mix all ingredients together and knead to form dough.
* Do not over knead.

~ Shaping
1. Divide the water and oil dough into 10 portions (water dough 22g each and oil dough 11g each). Shape them into balls.

2. Wrap each oil dough with water dough and form a ball. Repeat the same for the rest.

3. Roll out the ball (start from the 1st ball from step 2) into oval shape. Then roll up like swiss roll. Keep aside to rest. Repeat the same for the next ball.

4. Back to the 1st roll, flatten into long oval shape (do flatten by apply pressure from the middle, up and down). Again roll up like swiss roll. With the closing facing up, slightly press with finger in the middle to form ball (instead of roll). Keep aside to rest. Repeat the same for the rest.

5. Flatten the ball into round. Wrap in the filling. Shaping by slightly flatten the dough. Repeat the same for the rest of the balls.

6. Apply egg wash and bake in preheated oven 180C for 20 minutes.
 

Sunday, September 11, 2011

Flaky Flower Mooncake

Pin It Now!

I made another type of pastry mooncake but not that complicated as thousand layer pastry (Thousand Layers Mini Yam Mooncake and Thousand Layer Mooncake with Purple Sweet Potato Filling). I shape them into “flower” which I found very attractive. This time I only used vegetable oil instead of shortening or lard. I’m very happy with the flaky pastry of these flower mooncake.


Adapted and slightly modified from Jane’s recipe
Ingredients:
~ Water dough: about 6 x 26g each
95g plain flour
7g icing sugar
25g vegetable oil
30g water

~ Oil dough: about 6 x 18g each
80g plain flour
30g vegetable oil

~ Filling : 6 x 30g each
Some red bean paste

Methods:
~ Water dough
1. Mix the sifted flour and sugar together. Add in the oil and mix roughly. Pour all water at once and knead to form soft dough.
* I found that it is easier to get soft dough by adding all water at once.

2. Cover and leave to rest for 30 minutes.
 
~ Oil dough
1. Mix all ingredients together and knead to form dough.
* Do not over knead.

~ Shaping
1. Divide the water and oil dough into 6 portions (water dough 26g each and oil dough 18g each). Shape them into balls.

2. Wrap each oil dough with water dough and form a ball. Repeat the same for the rest.

3. Roll out the ball (start from the 1st ball from step 2) into oval shape. Then roll up like swiss roll. Keep aside to rest. Repeat the same for the next ball.

4. Back to the 1st roll, flatten into long oval shape (do flatten by apply pressure from the middle, up and down). Again roll up like swiss roll. Slightly press to form ball (instead of roll). Keep aside to rest. Repeat the same for the rest.

5. Flatten the ball into round. Wrap in the filling. Repeat the same for the rest of the balls.

6. Flatten the balls into round with rolling pin (about 7cm diameter). Make 4 cuts around the pastry with scissors. Slightly press a line between the cuts with scraper. Apply egg wash and sprinkle some black sesame in the center.

7. Bake in preheated oven 190C for 19 minutes.
Here I like to wish everyone a Happy Mid-Autumn festival !

Saturday, September 10, 2011

Lychee Konnyaku Jelly Mooncake

Pin It Now!
My family is a big fan of konnyaku jelly. Therefore I made some konnyaku jelly with moocake mould. To make them attractive I played with multicolours. This method was inspired by Happy Flour. Do visit her blog for more colourful jelly mooncake. 


Recipe from the konnyaku jelly powder packet instructions
Ingredients: yield about 4 pcs big mooncake and 12 pcs mini mooncake
(A) Pastry
10g konnyaku jelly powder


100g sugar
500ml water
500ml lychee syrup

Some food colouring
 

(B) Filling
Some canned lychee


Methods:
~ Pastry
1. Put the konnyaku jelly powder and sugar in a bowl. Mix till well combined. Set aside.

2. Bring the water to boil. Scoop some of the hot water into jelly powder mixture from step (1). Still until most of the konnyaku jelly powder dissolve.

3. Pour the step (2) mixture back into the remain hot water. Stir and bring to boil. Cook until all the sugar and konnyaku jelly powder dissolve.

4. Add in lychee syrup and bring to boil again.

5. Remove from heat and leave aside.

~ Assemble
1. Scoop some pastry into a bowl and add in a drop of food colouring of your choice (You may use more than one colour). Leave the balance plain

2. Fill the mould with 1 to 2tsp of coloured pastry. Leave aside to set.
* If you are using more than one colour, make sure the 1st colour is set before the next colour. I keep in fridge to fasten the setting process.

3. Once the coloured pastry set, gently spoon the plain pastry over until 1/4 full. Let it half set then place the canned lychee onto the mould.
 
4. Fill up the mould with the plain pastry. Leave them to set and chill in the fridge.

5. Loosen the side of the agar-agar, invert and gentle press the jelly out of the mould.

* For mini mooncake I just fill them with canned lychee follow by plain pastry. Create pattern by running a coloured toothpick (after dip into food colouring) around the mould. 


I am submitting this post for Aspiring Bakers #11: Mid-Autumn Treats (September 2011) hosted by Happy Home Baking .


Konnyaku

Thursday, September 8, 2011

Thousand Layer Mooncake with Purple Sweet Potato Filling

Pin It Now!

I make thousand layer mooncake again. This time I used purple sweet potato as the filling. And I make sure I weight the right amount of pastry for 12 pieces of mooncake :D This time is less time consuming and is a lot easier to shape the pastry compare to previous post, Thousand layer mini yam mooncake.


Adapted and slightly modified from Carol recipe
Do visit Carol blog for detail steps.
Ingredients:
~ Purple sweet potato filling
450g sweet potato
50g brown sugar
Pinch of salt
25g margarine/ butter

~ Water dough
200g plain flour
15g icing sugar
35g lard
100ml water

~ Oil dough
160g low protein flour
30g lard
40g vegetable oil
Some purple colouring


Methods:
~ Sweet potato filling
1. Steam the sweet potato till soft . While it is hot, add in brown sugar, salt and margarine. Mix well and mash into paste.
* I used electric mixer (with K hook) to do the job.

2. Leave aside to cool. Divide into 40g each.
 

~ Water dough
1. Mix the sifted flour and icing sugar together. Add in the lard and roughly mix to form crumbs. Pour all water at once and knead to form soft dough.
* I found that it is easier to get soft dough by adding all water at once.

2. Cover and leave to rest for 40 minutes.


~ Oil dough
1. Add purple colouring into the vegetable oil. Mix well.
* For more easy mixing and even colour.

2. Follow by lard and the flour. Mix together and knead to form dough.
* Do not over knead.
 

~ Shaping
1. Divide the water and oil dough into 6 portions (water dough 60g each and oil dough 40g each). Shape them into balls.

2. Wrap each oil dough with water dough and form a ball. Repeat the same for the rest.

3. Roll out the ball (start from the 1st ball from step 2) into oval shape. Then roll up like swiss roll. Keep aside to rest. Repeat the same for the next ball.

4. Back to the 1st roll, flatten into long oval shape (do flatten by apply pressure from the middle, up and down). Again roll up like swiss roll. Keep aside to rest. Repeat the same for the rest.

5. Cut the 1st roll into half. Flatten the dough into round. Wrap in the filling with cut side outward. Repeat the same for the rest of the rolls.

6. Bake in preheated oven 180C for 25 minutes. Then bake for further 2-3 minutes at 250C (for more golden brown).


Related Posts Plugin for WordPress, Blogger...