Sunday, September 30, 2012

Stir-fried Manicai with Eggs (马尼菜炒蛋)- MFF Sarawak #2

Pin It Now!
 
I have Manicai in my garden. Like other friends in Peninsular Malaysia we used to eat with 'Pan Mien'. My hubby suggests me to cook/fry Manicai with eggs which he had at the restaurant in Kuching. I have no idea until he ordered a plate for me at Chinese restaurant. One day I wanted to add a vegetable dish for my family dinner. The only vegetable I can get is Manicai from my garden! Why not try to cook with eggs? Of course I can't get it right. I just fry with eggs without process the Manicai. It ends up grassy fried eggs :D

After I read Stir-fried Manicai with Eggs recipe shown in Malaysia Food Fest, then only know it is common way of serving this vegetable with eggs in Sarawak. Thanks to Kelly for sharing this wonderful dish. Then I know the correct way of cooking Manicai should be washed, salted, and squeezed dry before cook. Now I can prepare nice sweet and with lightly chewy stir-fried Manicai with eggs :)


Adapted and slightly modified from Kelly Siew
Ingredients:
200g Manicai (plucked from stalks)
1 tablespoon salt

2 cloves garlic, minced
2 eggs
1 teaspoon MSG free Chicken stock powder (omit)
50ml water
1 tablespoon light soy sauce (optional)

Methods:
1. Wash the leaves thoroughly and add the salt. Leave for several minutes, then squeeze all the juice out. Rinse, and squeeze again. Place the leaves on chopping board and dice into small pieces. Set aside.
* Restaurant serve it's Manicai in small pieces. It is up to you whether like to dice or not.

2. In a wok/pan, heat 3-4 tablespoons of oil (you really need quite a bit to achieve that lovely sheen and moisture). Once it’s hot, cook the garlic until aromatic. Stir in the leaves and cook for about a minute till wilt. Add water when it starts to look quite dry (about halfway through).

3. Make a well in the middle, crack the eggs in and beat with chopsticks to mix. Once the eggs are starting to set, start mixing everything together, adding more water if needed. Turn off the heat after about a minute or so. Serve while hot.

I am submitting this dish to Malaysian Food Fest, Sarawak Month hosted by Sharon of Feats of Feasts.


Saturday, September 29, 2012

Flaky Mooncake with Red Bean Filling

Pin It Now!

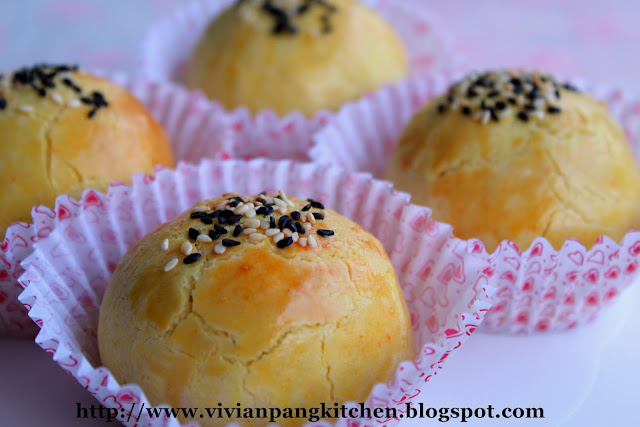
Flaky mooncake is the type of mooncake I like the most. Last year I make thousand layers mini yam mooncake, flaky mooncake (Fookchow style), and flaky flower mooncake. This year I choose this type of mooncake again. The pastry is considered Chinese pastry and it contains water and oil dough. The process of rolling and folding that creates beautiful layers.


The ideal fat to be used is clarified butter and ghee. However it can be substitute with lard. But today I'm using chicken fat. Do refer here and find out how to make your own chicken fat.
 
 
Ingredients:
~ Water dough: about 9 x 27g each
150g plain flour
15g icing sugar
55g chicken fat 
42ml water
 
~ Oil dough: about 9 x 16g each
100g low protein flour
50g chicken fat
 
~Filling
Homemade red bean paste (9 x 50g each)
*Shape into ball and set aside
 
~Topping
One egg for egg wash
Some black and white sesame seeds
 
Do refer to Carol blog for pictures and video links on making Chinese pastry.
Methods:
~ Water dough
1. Mix the sifted flour and sugar together. Add in the oil and mix roughly. Pour all water at once and knead to form soft dough.
* I found that it is easier to get soft dough by adding all water at once.
 
2. Cover and leave to rest for 30 minutes.
 
~ Oil dough
Mix all ingredients together and knead to form dough.
* Do not over knead.
 
~ Shaping
1. Divide the water and oil dough into 9 portions (water dough 27g each and oil dough 16g each). Shape them into balls.
 
2. Wrap each oil dough with water dough and form a ball. Repeat the same for the rest.
 
3. Roll out the ball (start from the 1st ball from step 2) into oval shape. Then roll up like swiss roll. Keep aside to rest. Repeat the same for the next ball.
 
4. Back to the 1st roll, flatten into long oval shape (do flatten by apply pressure from the middle, up and down). Again roll up like swiss roll. Repeat the same for the rest.
 
 5. With the closing facing up, slightly press with finger in the middle to form ball. Flatten the ball into round. Wrap in the filling. Shaping by slightly flatten the dough (Hold the base as you apply pressure on top while shaping. This can minimize the filling from leaking). Repeat the same for the rests.
 
6. Apply egg wash and sprinkle sesame seeds on top. Bake in preheated oven 180C for 20 minutes.
 
My flaky mooncake will turn soft the next day. Anyone know the reason? How can I get crispy layers? I really appreciate if anyone can help.
 
This will be my last mooncake post. I hope I have time to try out traditional moocake next year.


Wishing everyone a Happy Mid-Autumn Festival !
中秋节快乐! 
 

Friday, September 28, 2012

Sponge Cake (Birthday Cake) / Chiffon Cake Method

Pin It Now!

I make this cake last week. This pink birthday cake is for my little princess :) She is now 1 year old. She still wakes up at night for meals. She still needs to be carried a lot as still can't walk without holding. To her brothers, she is a 'little monster' who likes to disturb whenever they are doing homework. She also keen to 'attacks' toys when they are playing. However her brothers still love her and tolerate with what she did. To them she just a 'baby' inside the house :D

I'm very happy as I manage to get my sponge cake baked without much or very little shrinkage! Thanks to Sonia for helpful tips. Basically this sponge cake is just baked chiffon cake in round pan. In order to get chiffon cake rise nicely in round pan and without much shrinkage after cooling, several things need to be taken care of. Let me highlight some of the points that I know.

1. The pan that you used should not be non-stick. The cake will rise with the help of side pan. Do not lined pan and preferable with removable bottom cake pan. It is easy to remove after cooling.

2. The egg whites should be beaten till stiff stage (十分 / 硬性发泡). Do refer Egg Whites Beating Stage from Carol for the video on how and what the stiff whites look like. Practice make perfect. After master this you can have lots of successful cake that require beaten egg whites.

3. Bake the cake start with low temperature first. The low temperature will cook the cake through and rise slowly. Then finish baking by increase the temperature to brown the cake. This will avoid sudden rise and collapse of the cake. Do not skip the process of baking with higher temperature although the cake is cooked through. I baked at low temperature for the 2nd sponge cake till end. It has little crack compare with the 1st one which finish baking with higher temperature. However the brown surface becomes sticky and easy come out after cooling.
 

I hope with all the points that I highlighted can help you on getting nice, tall and beautiful sponge cake in your kitchen. Let me move to the recipe.    

Ingredients:
(A)
5 yolks
20g castor sugar
30g vegetable oil
1 tsp vanilla extract
45ml milk

(B)
60g cake flour

30g rice flour
*sift and set aside

(C)
5 whites
½ tsp vinegar (can replace with lemon juice)
60g castor sugar

 
Methods:
1. Whisk yolks and castor sugar till well combine. Add in vegetable oil and vanilla extract. Mix well.

2. Whisk in the sifted flour and milk in 2 batches alternatively.

3. In other bowl beat the whites till foamy. Add in 1/2 the castor sugar and vinegar. Continue beat till glossy. Add in the rest of castor sugar. Beat till stiff form
(十分 / 硬性发泡).

4. Spoon 1/3 of the stiff whites into yolks batter. Fold to combine. Pour the yolk mixture into the remaining whites bowl. Fold till well combine.

5. Pour into 8” round pan with removable bottom (do not line with paper and do not use non-stick pan). Bake at 140C for 25 minutes. Increase the temperature to 150C and bake further 25 minutes.
As you see the side not shrink much after cool
6. Once cooked remove from oven. Immediately invert and leave to cool. When cake is cool, remove from mould. Deco the cake as you wish!

I'm sharing this post at: 


Thursday, September 27, 2012

Cream Puffs

Pin It Now!
Cream puff is very versatile dessert as it can be served with sweet and savoury filling. Eggs, butter, milk and flour are all you need to make cream puff. You can start straight away after reading this recipe! The making process is simple. No machine involved. It only needs a bit muscle strength :D  


Adapted from Carol
Yield about 15 pieces with 3cm diameters puff
Ingredients:
(A)
2 eggs(weight about 110g)

45g unsalted butter
85g milk(or water)

(B)
55g low protein flour
1/8 tsp salt

Methods:
1. With a fork slightly whisk the eggs till combine. Set aside.

2. Sift flour and salt and set aside.

3. Add in butter and milk in a cooking pot. Bring to boiled with medium-low heat.

4. Once boiled turn the heat low. Add in all sifted flour and stir quickly with wooden spoon.
*Keep stirring with the heat still on. Once the dough separate from the side of pan and turn a bit translucent, remove from heat. Leave to cool (about 5-10 minutes. The cooked dough should be not hot when touch).

5. Add in the whisked eggs slowly in 3-4 times. Stir with spoon to incorporate the eggs into cooked dough. Make sure the eggs are well combined before adding the more eggs.

6. After adding 2 eggs the batter should have dropping consistency like this.
*after adding all eggs and still not achieve dropping consistency add a little bit more egg.

7. Put the cream puff batter into piping bag. With 1cm round nozzle tip pipe out the cream puff (about 3cm diameter) on greased baking paper.
*I used my only 1cm star nozzle.
*can be done by putting batter into plastic bag. Just cut a hole at one end and pipe accordingly.

8. Wet your finger and lightly tap the tip of cream puff. With a toothpick make a cross on top (help to achieve nice crack). Repeat till all finish.


9. Spray water on the cream puff. This is to prevent the cream puff from getting dry too quickly.

10. Bake in pre-heated oven 200C for 10 minutes. Reduce the temperature to 190C and bake for another 10 minutes. Again reduce to 180C and bake further 15 minutes till brown (I bake mine 7 minutes). Off the heat and leave the baked cream puff inside oven for 10 minutes.

11. Remove and cool on wire rack before serve.


For those who haven't make cream puff before why not try it today! It is not complicated as it looks!


I'm sharing this post at Recipe Box#16 hosted by Bizzy Bakes.

I’m glad I able to join this time Bake-along hosted by Zoe from Bake for Happy Kids, Joyce from Kitchen Flavours and Lena from Frozen wings.
This InLinkz widget is not allowed in this website. You can still view the linkup here


Wednesday, September 26, 2012

Shanghai Mooncake

Pin It Now!
 
Mooncake with buttery pastry and sweet filling definitely well received by crowd. I saw this Shanghai mooncake recipe in Sonia house. Without much consideration I know I have to make this. I omit salted egg yolk and half the recipe. It is pretty much like making pineapple tarts ^^


Adapted and slightly modified from Sonia, nasi Lemak Lover
Half of the recipe yield 9 pieces mooncake
Ingredients:
~ pastry
125g butter
75g icing sugar
1/2 egg (large)
190g plain flour
30g custard powder

~filling
Homemade red bean paste (from early post) or any of your preferred filling
 
~topping
Egg wash from remain half egg from pastry
Black and white sesame seeds

Methods:
1. Weight 40g of red bean paste each. Shape into ball and set aside.
*If your self-made red bean paste curdle and hard after take out from fridge, slightly knead with hand to soften it. It is a lot easier to divide and shape.

2. Beat butter and icing sugar till creamy (do not over beat, 2-3mins just nice).

3. Add in egg, beat well to combine. Add in sifted flour and custard powder. Fold to combine into soft dough.

4. Cover with cling wrap and chill in the fridge for 30 minutes.

5. Weight dough for 50g each and shape to ball.

6. Flatten dough with palm and wrap up the red bean paste filling. Shape it like an egg shape. Place on baking tray.

7. Lightly brush the whole mooncake with egg wash and decorate top with black and white sesame seeds.

8. Bake at pre-heated oven at 180C for 20-25 minutes.

9. Leave to cool on wire rack completely before store.
 

Sunday, September 23, 2012

Red Bean Filling

Pin It Now!

After read mung bean filling from Christine's Recipes I keen to try. Instead of mung bean I used red bean. Although I used to make own red bean filling, it is not good as mooncake filling.

I used to blend my cooked beans and it ends up quite a lot liquid. It takes longer time to reduce the moisture. This time I discard excess water and press through fine sieve to get smooth purée.

In her recipe, wheat starch is used. I found that it not only helps on getting smooth filling it also reduce the splitting during the cooking process. Therefore no need to worry of 'volcano' popping out from hot red bean filling :D

I'm glad I made it! I would say it is my best red bean filling recipe I ever make. Maybe it is too late for your mooncake filling. But you can make this red bean filling for steamed buns and bread too.


Reference from Christine's Recipes, mung bean filling
Yield about 1.5kg
Ingredients:
600g red beans
2 tbsp salt (for soaking beans)
220g caster sugar
120ml vegetable oil
3½ tbsp wheat flour

Methods:
1. Rinse red beans well. Add 2 tablespoons salt into water and soak the beans at least 2 hours.


2. Drain away the salt water. Put the beans into a container. Fill with fresh water and make sure the beans are fully covered. Keep in freezer for overnight.
*I learnt this trick from a Taiwanese cooking show. This can help the process of getting nice soft texture (绵细) beans. This method also can be used in soaking peanuts, black beans etc.

3. The next day, remove the beans from freezer and put into pressure cooker (no need to defrost). Cover the beans with water (about double of the beans weight). Cook for 5 minutes.
*do adjust accordingly. The red beans should be easy to be smashed with finger tips after cooked.


4. Drain beans out and discard excess water. Use a large spoon to press through a fine sieve. You’ll get very smooth red bean puree.


5. Transfer the puree into a heavy bottom wok (or pot). Add sugar and oil. Combine well. Cook over medium high heat until moisture is reduced by two-thirds. Sift in wheat flour in batches and stir to combine well between each addition. Reduce heat to low and simmer until thickened, stirring constantly, about 15 to 20 minutes.


6. Transfer into a large bowl and let it cool down completely. You can make red bean filling one or two days ahead. Wrap it in plastic film and store in fridge.
* The cool red bean filling will become curdle. Just knead the filling for few times and it will get back smooth again. Divide into required portions. Then shape into balls before wrap.

The filling is not too dry or not too wet. The texture should be like smooth dough, easily pulled away from pan.


Saturday, September 22, 2012

Midin Salad with Smoked Shrimps-MFF Sarawak #2

Pin It Now!
 
Midin is very common type of fern available in Sarawak. It is very popular and usually fried with shrimp paste (belachan) or anchovies (ikan bilis). It is a must ordered dish when you visit Sarawak.


This is midin. Don't they look like paku? Do click here to find out what difference between them.
 
I ordered midin salad in one of the restaurant here. It was quite nice! Instead of having midin stir-fried why not try salad version :D


I added some smoked shrimps for crunch texture. Do they look like dried shrimps? I bought this from wet market. Local call them smoked shrimps. It actually like dried shrimps but come in whole and bigger in size. The local have them as snack. Just wash it and they are good to pop inside your mouth! It tastes sweet with the fragrant of dried shrimps. The texture is harder with some crunch compare with ordinary dried shrimps. It quite nice! Instead of having as snack I toss into my midin salad.

 
Here what I have in my salad.

Ingredients:
~salad
1 bundle of midin
Capsicum
Carrot
Bombay onion
Handful of smoked shrimps


~Salad dressing
Lime juice
Vinegar
Sugar
Soya
Chili sauce
Sesame oil
* adjust according to your taste.
 
Methods:
1. For midin, discard the older stalks and leaves. Keep the curled leaf stalks and young leaves. Wash to get clean. Drain and set aside.
 
2. Bring a pot of water to boil. While waiting for the water to boil, get another bowl with ice cold water. Cook the midin in hot water for a minute or so. Drain and immediately put into ice cold water to stop from further cooking.
* do not overcook as it will lost the crunchiness of midin.
 
3. Drain away the cold water and prepare other vegetable for the salad. Cut carrot, capsicum and onion into thin slices.
 
4. Mix all the salad dressing well. Pour into the vegetables and smoked shrimps mixture. Toss well and serve!

 
I am submitting this dish to Malaysian Food Fest, Sarawak Month hosted by Sharon of Feats of Feasts.
 
Related Posts Plugin for WordPress, Blogger...